Getting started for developers
Overview
The information on this page is for developers at city agencies that are building or redesigning websites or applications using resources outside of the Office of Technology and Innovation (OTI). If you have a website that is currently on TeamSite CMS and supported by OTI, the design system will be applied systematically in future updates. If you have a custom application supported by OTI, ask your OTI support team for more details.
If you’re a developer working for NYC government, here’s how you can get started using the design system.
1. Request an onboarding session
The first step is to reach out to the Digital Service team in the Office of Technology and Innovation (OTI). We’ll assess your needs and make sure the design system is right for your use case. If it is, we’ll help you get onboarded into our Azure project and get access to the code.
2. Get access to the Azure project
We’ll help you get access to the NYC Design System Azure project. Access to the Azure project is required to install and use our library.
3. Set up environment
The NYC Digital Design System is available as a set of Node packages that distribute CSS and JS files. After getting access to the Azure project, your first step will be to install Node.js and set up authentication between the registry and your computer via a user-level .npmrc file. The user-level .npmrc file is used by Node.js to authenticate your computer against our private Azure registry.
Install Node.js
Please follow the documentation provided by Node.js to install it.
Create user-level .npmrc file
Windows
To create your user-level .npmrc file for registry authentication on Windows, you can run the following commands from your User directory.
Install vsts-npm-auth
npm install -g vsts-npm-auth --registry https://registry.npmjs.com --always-auth falseRun vsts-npm-auth
vsts-npm-auth -config .npmrcNow you can move on to step 4, Install the @nycds/core package.
MacOS/Linux
If you’re using MacOS or Linux, the vsts-npm-auth package is not available and you’ll have to create your user-level .npmrc file yourself.
First, create a file titled .npmrc in your user’s home directory and paste the below in it

Notice where it says [BASE64_ENCODED_PERSONAL_ACCESS_TOKEN] above. Next, we’ll create a token to replace this string.
To create a personal access token (PAT), visit the personal access tokens page under your Azure DevOps User Settings menu. Once on this page, click ‘New Token’ to create a token. You’ll see a popup to ‘create a new personal access token.’
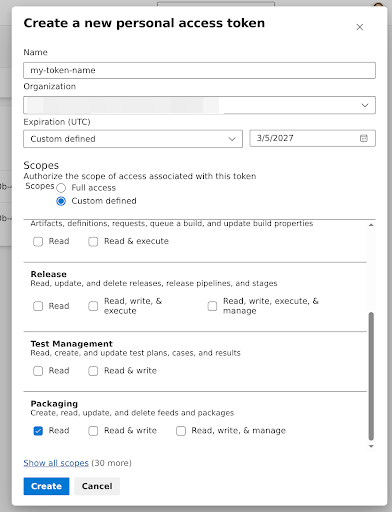
Give your token a name and set the expiration date for one year in the future. Then scroll down the scopes panel to the ‘packaging’ section and select ‘Read.’ Then click ‘Create.’
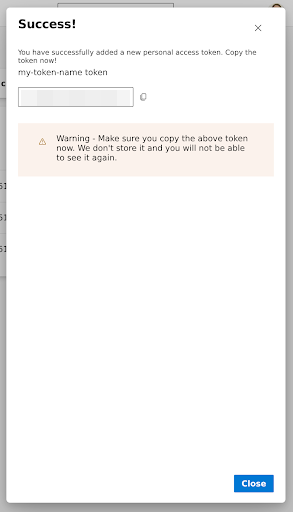
You will now be presented with your token. This is the only opportunity you will have to copy the token, please copy it somewhere safe to continue the setup.
Next, you will Base64-encode your PAT for inclusion in your .npmrc file. To do so, please run the following command in a terminal:
node -e "require('readline') .createInterface({input:process.stdin,output:process.stdout,historySize:0}) .question('PAT> ',p => { b64=Buffer.from(p.trim()).toString('base64');console.log(b64);process.exit(); })"This command will prompt you for your PAT. Paste your PAT from earlier into the terminal as in this example:
The command will print out your Base64-encoded Personal Access Token. Copy this value, visit your .npmrc file, and replace the [BASE64_ENCODED_PERSONAL_ACCESS_TOKEN] string with your encoded token.
You should now be ready to install NYC Design System packages
4. Install the @nycds/core package
The @nycds/core package is the primary distribution of our library. It contains bundled outputs of all required CSS and JS. To use the library with your project, you’ll need to set up a new Node.js project or install it in an existing Node.js project.
To set up a new Node.js project, run the following command from a directory where you’d like to store your project’s source code:
npm initThis will create a package.json file, which declares all of your project dependencies. If you have an existing Node.js project, this file should already exist in your project's root directory.
Next, run this command to install our Core package:
npm install @nycds/coreIf this command fails with a ‘401 Unauthorized’ error, there is an issue with your .npmrc file or your PAT. Please consult that section of the documentation again.
If the command completes successfully, you’re ready to use the library!
5. Use the library
These instructions assume your project is using a Javascript bundling library such as Webpack, Vite, or Rollup. If you’re new to client-side web development tools, MDN has a guide to help you get started.
You use the design system library by importing the CSS and JS into your project then using the required component CSS classes in your markup. If you’d like to use one of our Custom Elements, you’ll have to import the desired component into a JS file and run its define function to register it.
Importing CSS
You can import the CSS into your project by adding this to a JS source file:
import ‘@nycds/core/dist/nycds-core.css’Now try using our Button component by referencing its CSS classname:
<button class="nyc-button">My Button</button>Importing JS
To use the Custom Elements distributed by the library, you can import the desired element’s JS Class and run its define command. For example:
import { NYCBackToTop } from ‘@nycds/core’

NYCBackToTop.define()
Now you can use <nyc-back-to-top></nyc-back-to-top> in your application markup.
To see which components provide Custom Elements, view the code tab of each component.
6. Keep the library up to date
To keep the library up to date, simply update the package version of the @nycds/core library in your package.json file. You can run npm outdated to see which packages in your project have newer versions available, then run npm install @nycds/core@latest to get the latest version.
The NYC Digital Design System follows semantic versioning. Semantic versioning is a numbering system used in software development to track changes to a product and is used to indicate whether a release is a patch, a minor release, or a major release. We recommend that after you update to a new version, you follow a standard quality assurance process. For major versions, your team must conduct additional testing as these are usually changes that are not backwards compatible.
Release process
The NYC Digital Design System follows a continuous development cycle as components are updated and new components are introduced. You can expect quarterly releases along with release notes for you to make informed decisions about when you would like to update to the latest version. The release dates will be communicated in advance on this website. Check back for information about upcoming releases.
Defects will be addressed and delivered in patch releases and also communicated on this website.
Quality assurance
The NYC Digital Design System follows a well-defined change request process. We conduct multiple rounds of QA to ensure that all fixes and features are implemented to fulfill the needs of our end users. Our QA process includes automated regression testing, manual testing, and accessibility testing to ensure that the quality of our releases are maintained. All releases can be found in the artifacts directory (opens Azure DevOps).
While every effort is made to assure the quality of our releases, issues and bugs do arise. If you find a bug, send us a message.